BIDS App Tutorial #2: fMRIPrep
Note
This article was contributed by Daniel Levitas of the Perception and Neuroimaging Lab at Indiana University.
What is fMRIPrep?
fMRIPrep is a BIDS App that employs a standardized pre-processing pipeline on BIDS-compliant fMRI data. This pipeline utilizes the leading tools from different fMRI software packages (AFNI, FSL, ANTs, Freesurfer, nipype) to perform specific steps during the pre-processing. Rather than being limited to an individual package, fMRIPrep will leverage the best software tool for each pre-processing step, such as ANTs for normalization, FreeSurfer for surface reconstruction, and so on. In addition, users can easily access the workflows to determine how their data is pre-processed, thus providing better transparency and reproducibility.
fMRIPrep Tutorial
This tutorial will demonstrate how to install fMRIPrep and run it on a dataset. The data that we’ll be using is the BIDS-ified output from the BIDS Overview and Tutorial.
If you haven’t looked through and completed the previous tutorials in this OpenScience section then I’d recommend doing so first. If however you wish to get started with this tutorial instead, you can download the BIDS output data here. Be sure to download the entire folder and not just the subfolders or files. If the download appears to have stalled, cancel the current download and retry. Once downloaded, extract/unzip the files if they haven’t been already (presumably to your Downloads folder), and type the following into the terminal, line by line:
mkdir $HOME/BIDS_tutorial
mv ~/Downloads/BIDS_data/* $HOME/BIDS_tutorial
rm -rf ~/Downloads/BIDS_data*
Note
fMRIPrep is computationally expensive, therefore it is recommended that this tutorial be completed on your university/institution’s HPC or a personal computer with greater processing power and memory. While you may use a computer with standard processing power, doing so will increase the time needed for fMRIPrep to run to completion.
fMRIPrep Installation Option #1: Singularity
fMRIPrep can be run as a Docker or Singularity container, so we’ll first need to build the container. If you’re on a High Performance Computing (HPC) cluster then you’ll want to build a Singularity container, as Docker containers are not permitted on HPC systems due to required root access permissions that no HPC admin is going to allow (don’t they trust us?). If you’re using MacOS or Windows, skip this and review the Docker installation section instead. If you are working on a university HPC, you may already have the Singularity software available (just make sure you have version >= 2.5). Assuming this, type the following into the terminal to build the container:
singularity build $HOME/fmriprep.simg docker://poldracklab/fmriprep:latest
fMRIPrep Installation Option #2: Docker
Assuming that you do not have Docker installed, go to the Docker installation page and select the download for your operating system. Once downloaded, click on the Docker.dmg installer and drag the Docker icon into your Applications (you may need your computer’s admin password for this). Be sure to click the Docker icon to open it.
Click on the Docker icon and select Preferences, then Resources, and then Advanced. You will want to increase the CPUs and Memory, since fMRIPrep is quite computationally expensive. Once selected, click on the Apply & Restart button.
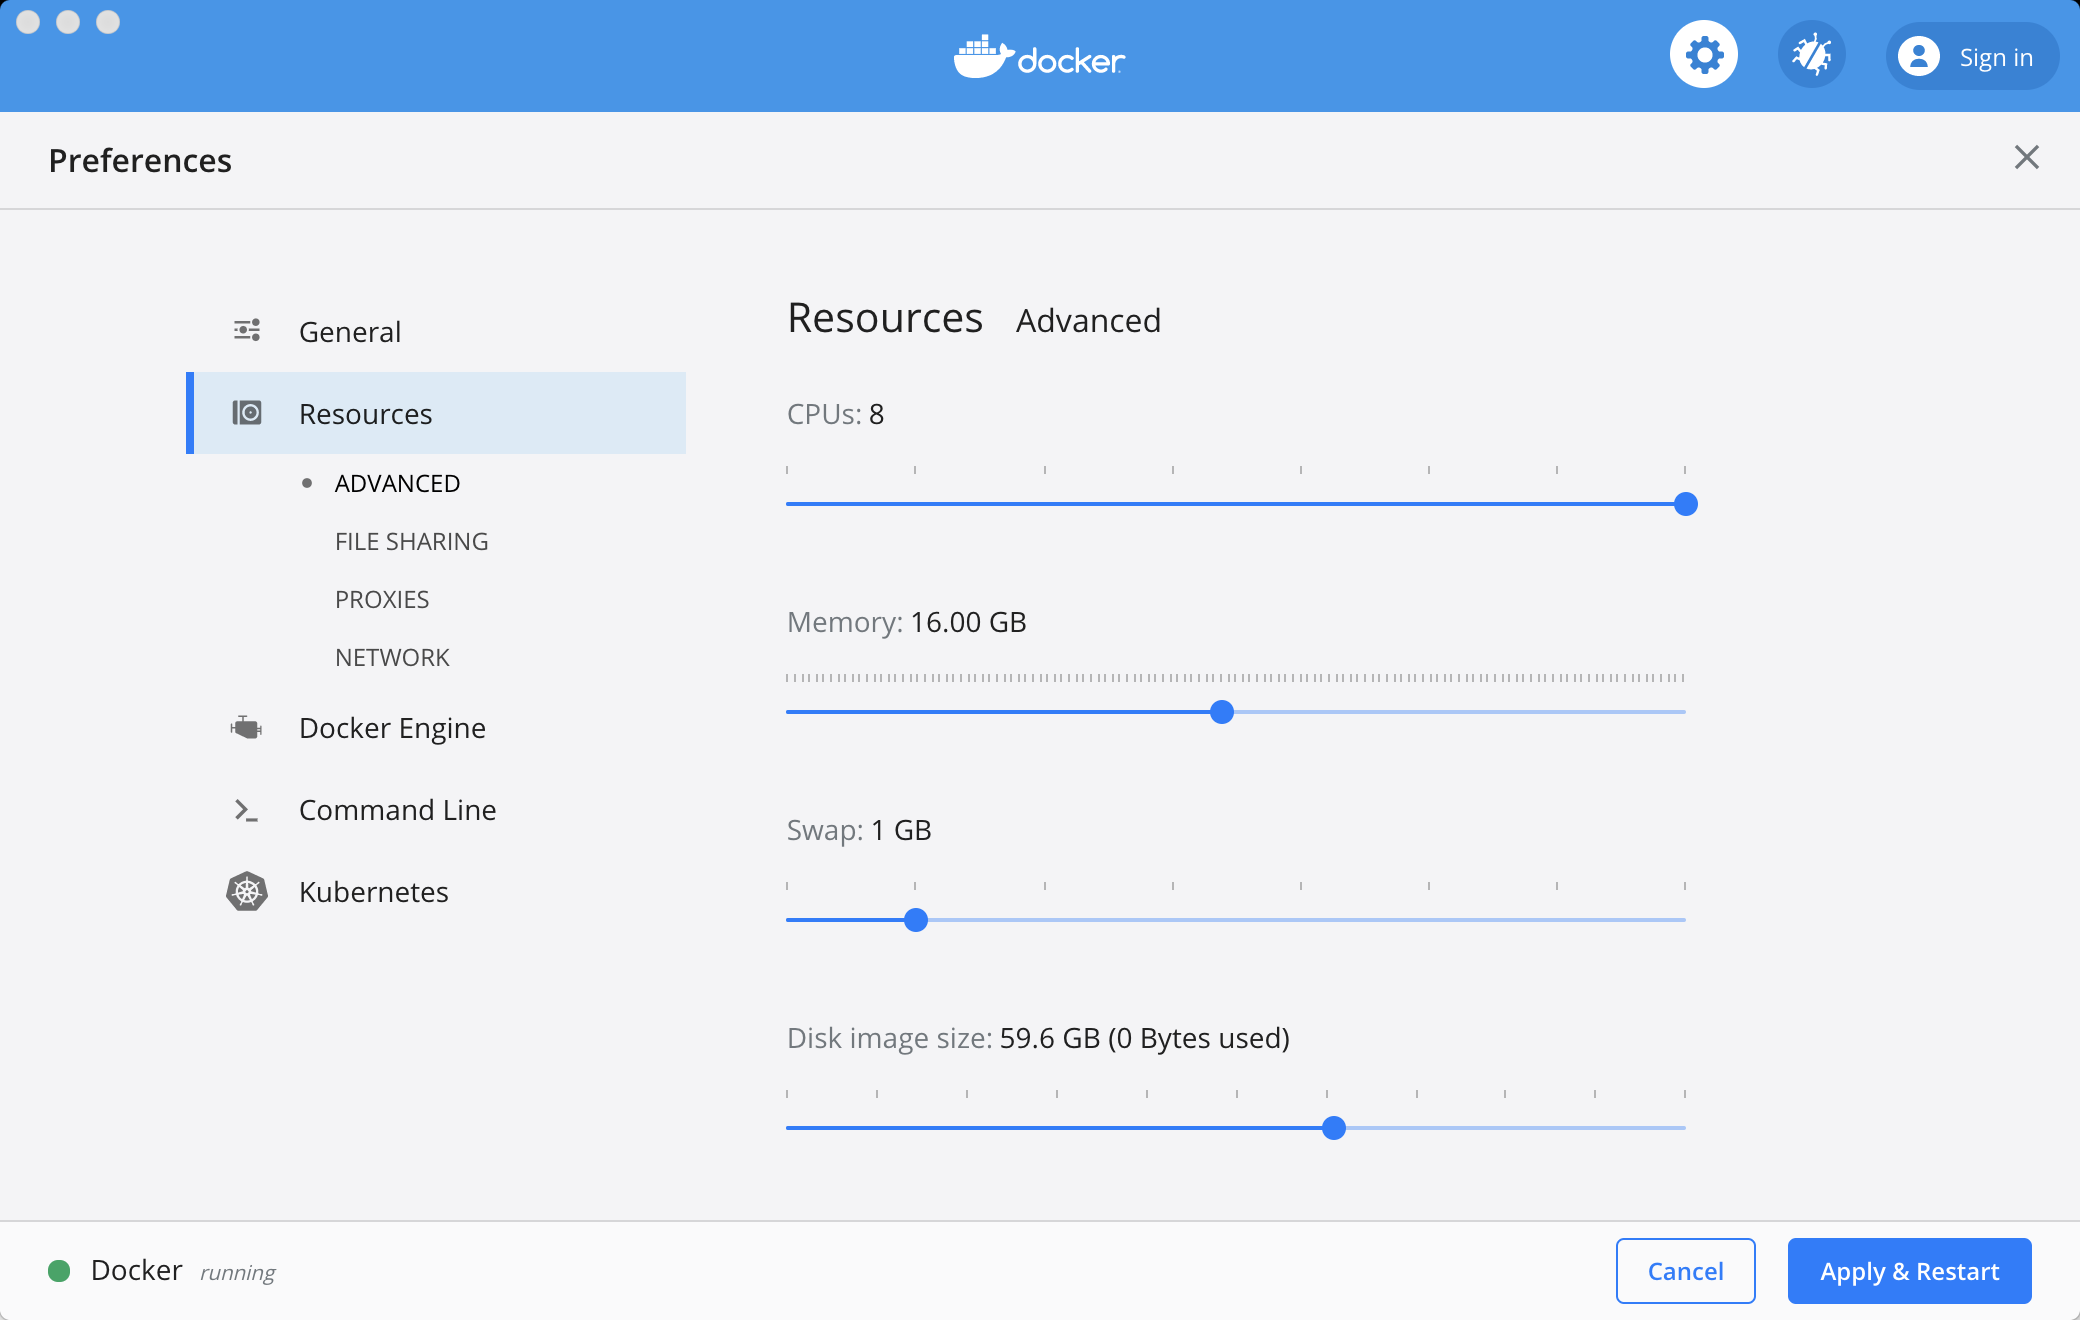
The Docker Preferences tab. The total number of CPUs and Memory may be different for your machine; increasing the number of CPUs and Memory will speed up fMRIPrep.
The next step is to use pip, a command for downloading and installing packages. If you do not have pip installed (or in your $PATH), refer back to the BIDS Overview and Tutorial for guidance.
At this point the docker command should now be in your $PATH, and you can type the following into the terminal to get things set up:
python -m pip install --user --upgrade fmriprep-docker
Note
Once the fmriprep-docker command is installed, you may need to set your path to point to where the command is, in order to run it. To do this, from the terminal type: echo 'export PATH=$PATH:/Users/ajahn/Library/Python/2.7/bin' >> ~/.bash_profile, and then type source ~/.bash_profile to set the path automatically whenever you open a new terminal.
What we’ve just installed is a wrapper that will create a Docker command to download the latest fMRIPrep container. Unlike MRIQC, fMRIPrep goes through more releases, typically for bug fixes and feature additions/modifications. Oftentimes, the changes from version to version are minor and do not require upgrading to the latest version, unless the changes in the newest version are pertinent to you. Regardless, you should preprocess your entire dataset using the same fMRIPrep version.
Installing TemplateFlow
TemplateFlow is a repository containing various standardized templates to normalize your data to in fMRIPrep. If for example you have a pediatric dataset, there is a pediatric template in TemplateFlow at your disposal.
To install TemplateFlow, type the following into the terminal, line by line:
pip install templateflow --target $HOME/.cache
unzip $HOME/.cache/templateflow/conf/templateflow-skel.zip -d $HOME/.cache/templateflow
Once finished, you should see multiple template options in your $HOME/.cache/templateflow folder.
Installing FreeSurfer license
fMRIprep leans heavily on FreeSurfer for certain parts of the pre-processing. Although the entire FreeSurfer package is not required in order to use fMRIPrep, you will need FreeSurfer’s license file, which is free. If you are on your university/institution’s HPC then FreeSurfer (and the license) is likely already available for you, and you can skip this step. If you need to get the license, the assumption here is that you are working on a personal computer, and by extension, also using Docker.
To get the license, go to the registration page and complete the form. Be sure to select the correct operating system that you’re using. Once complete, an email will be sent that contains the license.txt. Download the file to Downloads, and then move it into the BIDS_tutorial folder using the following command in the terminal:
mv ~/Downloads/license.txt $HOME/BIDS_tutorial/derivatives
Making a script to run fMRIPrep
Running fMRIPrep entails specifying different command line options in order to properly run. Rather than doing this directly through the terminal, we will create a script to run it. Firstly, type the following into the terminal:
touch $HOME/BIDS_tutorial/code/fmriprep.sh
This generates a blank bash script file to run fMRIPrep. Below, a mock script is provided that can be copied and pasted into the fmriprep.sh file. To do this, first copy the mock script below and then open the fmriprep.sh file, by typing the following into the terminal:
vim $HOME/BIDS_tutorial/code/fmriprep.sh
Press the “i” key, and paste the contents below into the file. To save and close the file, press the Escape button, and type the following: :wq
#!/bin/bash

#User inputs:
bids_root_dir=$HOME/BIDS_tutorial
subj=01
nthreads=4
mem=20 #gb
container=docker #docker or singularity

#Begin:

#Convert virtual memory from gb to mb
mem=`echo "${mem//[!0-9]/}"` #remove gb at end
mem_mb=`echo $(((mem*1000)-5000))` #reduce some memory for buffer space during pre-processing

export TEMPLATEFLOW_HOME=$HOME/.cache/templateflow
export FS_LICENSE=$HOME/BIDS_tutorial/derivatives/license.txt

#Run fmriprep
if [ $container == singularity ]; then
  unset PYTHONPATH; singularity run -B $HOME/.cache/templateflow:/opt/templateflow $HOME/fmriprep.simg \
    $bids_root_dir $bids_root_dir/derivatives \
    participant \
    --participant-label $subj \
    --skip-bids-validation \
    --md-only-boilerplate \
    --fs-license-file $FREESURFER_HOME/license.txt \
    --fs-no-reconall \
    --output-spaces MNI152NLin2009cAsym:res-2 \
    --nthreads $nthreads \
    --stop-on-first-crash \
    --mem_mb $mem_mb \
    -w $HOME
else
  fmriprep-docker $bids_root_dir $bids_root_dir/derivatives \
    participant \
    --participant-label $subj \
    --skip-bids-validation \
    --md-only-boilerplate \
    --fs-license-file $HOME/BIDS_tutorial/derivatives/license.txt \
    --fs-no-reconall \
    --output-spaces MNI152NLin2009cAsym:res-2 \
    --nthreads $nthreads \
    --stop-on-first-crash \
    --mem_mb $mem_mb \
    -w $HOME
fi
Warning
Thomas Ernst has made the following comment that is particularly important for Ubuntu users: “[In this script,] the temporary eval dir is set to be the $HOME dir. That is bad for two reasons: Firstly, at least on Ubunbtu, fmriprep will not clean up the temp dir, easily leading to a overfull home dir/main disk and stopping eval after a few subjects. Secondly, if you select the –clean-workdir option this will delete the entire content of the $HOME dir before crashing.”
Furthermore, if you are using a supercomputer cluster, you may want to use the /tmp/scratch directory to store the output. Bennet Fauber of the University of Michigan recommends setting the following variables for the directories:
BIDS_DIR=/tmp/workflow_${SUB}/BIDS OUTPUT_DIR=/tmp/workflow_${SUB}/derivatives WORK_DIR=/tmp/workflow_${SUB}/work
Bennet: “It’s almost certainly not a good idea to make WORK_DIR the home on a cluster, as home is likely to have a small quota, be NFS, and be slow. There’s almost always some kind of /scratch for that, or, as we do, /tmp. If using /tmp, it’s a good idea to have code to remove work directories after the job finishes, unless debugging.”
To ensure that the information was added and saved to the script, you can type the following into the terminal:
cat $HOME/BIDS_tutorial/code/fmriprep.sh
Before running, change the container variable in the script to either *docker* or *singularity*, depending on which container you installed. You may also want to increase the mem and nthreads variables if your computer/system has greater computing power, which will decrease the time needed for fMRIPrep to complete. You can make these edits using vim.
Once you’re set, run the script by typing the following into the terminal, line by line:
bash
source $HOME/BIDS_tutorial/code/fmriprep.sh
fMRIPrep make take up to several hours to run on this data, depending on how much processing power and memory you allocated. Do note that the fMRIPrep command we are running is relatively bare-bones; there are many additional flag options that can (and should) be used, so it’s recommended that you read the documentation for them here. Be aware that if in the future you run fMRIPrep with additional options, it will likely increase the time needed to run to completion.
Understanding fMRIPrep output
Once complete, there are two main things that fMRIPrep generates that will be of interest: the pre-processed data itself, and an HTML report. Regarding the data itself, the fMRIPrep developers & contributors have already provided excellent documentation on where files are and what the mean; that documentation can be found here.
This tutorial will instead focus more on the HTML report itself, which provides handy visualizations to better determine how well the pre-processing went. If you have a built-in browser, you can open the report by typing the following into the terminal (firefox example):
firefox $HOME/BIDS_tutorial/derivatives/fmriprep/sub-01.html
If this option isn’t available to you, open a browser and type Command O and then select the sub-01.html file. Once opened, you should see several tabs listed at the top: 1). Summary 2). Anatomical 3). Function 4). About 5). Methods 6). Errors
You can click on these tabs to jump to that specific section in the report.
The first you should check is the Errors tab. Make sure that it says “No errors to report!”; otherwise, it will list an error that will require further examination. So long as this section reads “No errors to report!”, the pre-processing ran to completion without issue.
The Summary tab will direct you to the section that provides some brief information on the anatomical and functional acquisitions.
The Anatomical tab will direct you to the anatomical section of the report (shocking, I know). The first image you should see is Brain mask and brain tissue segmentation of the T1w, where the red line encompasses the entire brain, the blue line encompasses white matter, and magenta encompasses the cerebral spinal fluid (CSF). This will give you an idea of the quality of the skull extraction. The second image you should see is Spatial normalization of the anatomical T1w reference; if you hover your mouse over the image, it will display the back and forth between the anatomical and standard template. This allows you to assess the quality of the normalization step.
The Functional tab can be divided into the individual runs. Each run section will begin with a quick summary. The first image is Susceptibility distortion correction, which demonstrates how well the field maps were applied to the functional run. Hover the mouse over the image to see the before SDC and after SDC. The second image is Alignment of functional and anatomical MRI data (surface driven) and shows the quality of the co-registration step. The third image is Brain mask and (temporal/anatomical) CompCor ROIs, which shows the brain tissue ROIs used to generate the CompCor confounds. The fourth image is Variance explained by t/aCompCor components, which can be used to determine the number of CompCor confounds to include in your design matrix for analysis. The fifth image is BOLD Summary, the Power plot that provides information regarding the level of motion present in the run. The BOLD Summary visualization is only generated if one of the standard output spaces is the MNI152NLin2009cAsym template. The sixth image is Correlations among nuisance regressors, which can be used to choose confounds for the design matrix that don’t exhibit high levels of correlations. Note that for the seconds runs of the bart and rest tasks, there is another image called Estimated fieldmap and alignment to the corresponding EPI reference. This is because those runs had the magnitude/phasediff field maps applied to them, as opposed to spin echo field maps.
The About tab specifies the fMRIPrep version and command used for this subject’s pre-processing.
The Methods tab details the pre-processing steps taken in greater detail.
Final Thoughts
In this tutorial we went over how to set up and run fMRIPrep on a BIDS dataset containing one subject. The purpose was to become familiar with how to set up and run fMRIPrep and understand the output. If you found this useful and would like to use fMRIPrep on your own data, you will likely want to include additional features in the script or make your own. Since this tutorial was an extremely simplified implementation of fMRIPrep, you may encounter issues when running it on your own data. Fear not, you can post your questions/issues on NeuroStars or fMRIPrep’s github page.
Additional fMRIPrep Resources
Here are some additional fMRIPrep resources/links that you may find helpful