fMRI Tutorial #6: Scripting
Overview
After you’ve preprocessed and set up a model for a single run for a single subject, you will need to do the same steps for all of the runs for all of the subjects in your dataset. This may seem tedious but doable - we only have twenty-six subjects, and two runs per subject. You may think that it can be done over the course of a week or so; and you can always assign the task to a couple of Research Assistants.
At some point, however, you will run into two problems:
You will find that manually analyzing each run is not only tedious but prone to error, and the probability of making a mistake increases significantly as the number of runs to analyze also increases; and
For larger datasets - for example, eighty subjects with five runs each - this approach quickly becomes impractical.
An alternative is to script your analysis. Just as an actor has a script which tells him what to say and where to stand and where to move, so can you write a script that tells your computer how to analyze your datasets. This has the double benefit of automating your analyses and being able to analyze datasets of any size - the code for analyzing two subjects or two hundred is virtually identical.
First we will create a template that contains the code needed to analyze a single run, and then we will use a for-loop to automate the analysis for all of the runs. The idea is simple; and although the code can be difficult to understand at first, once you become more comfortable with it you will see how you can apply it to any dataset.
Note
The following tutorial complements the Unix tutorial on automating the analysis. I recommend reading through that chapter if you need to review the Unix terms for scripting.
Creating the Template
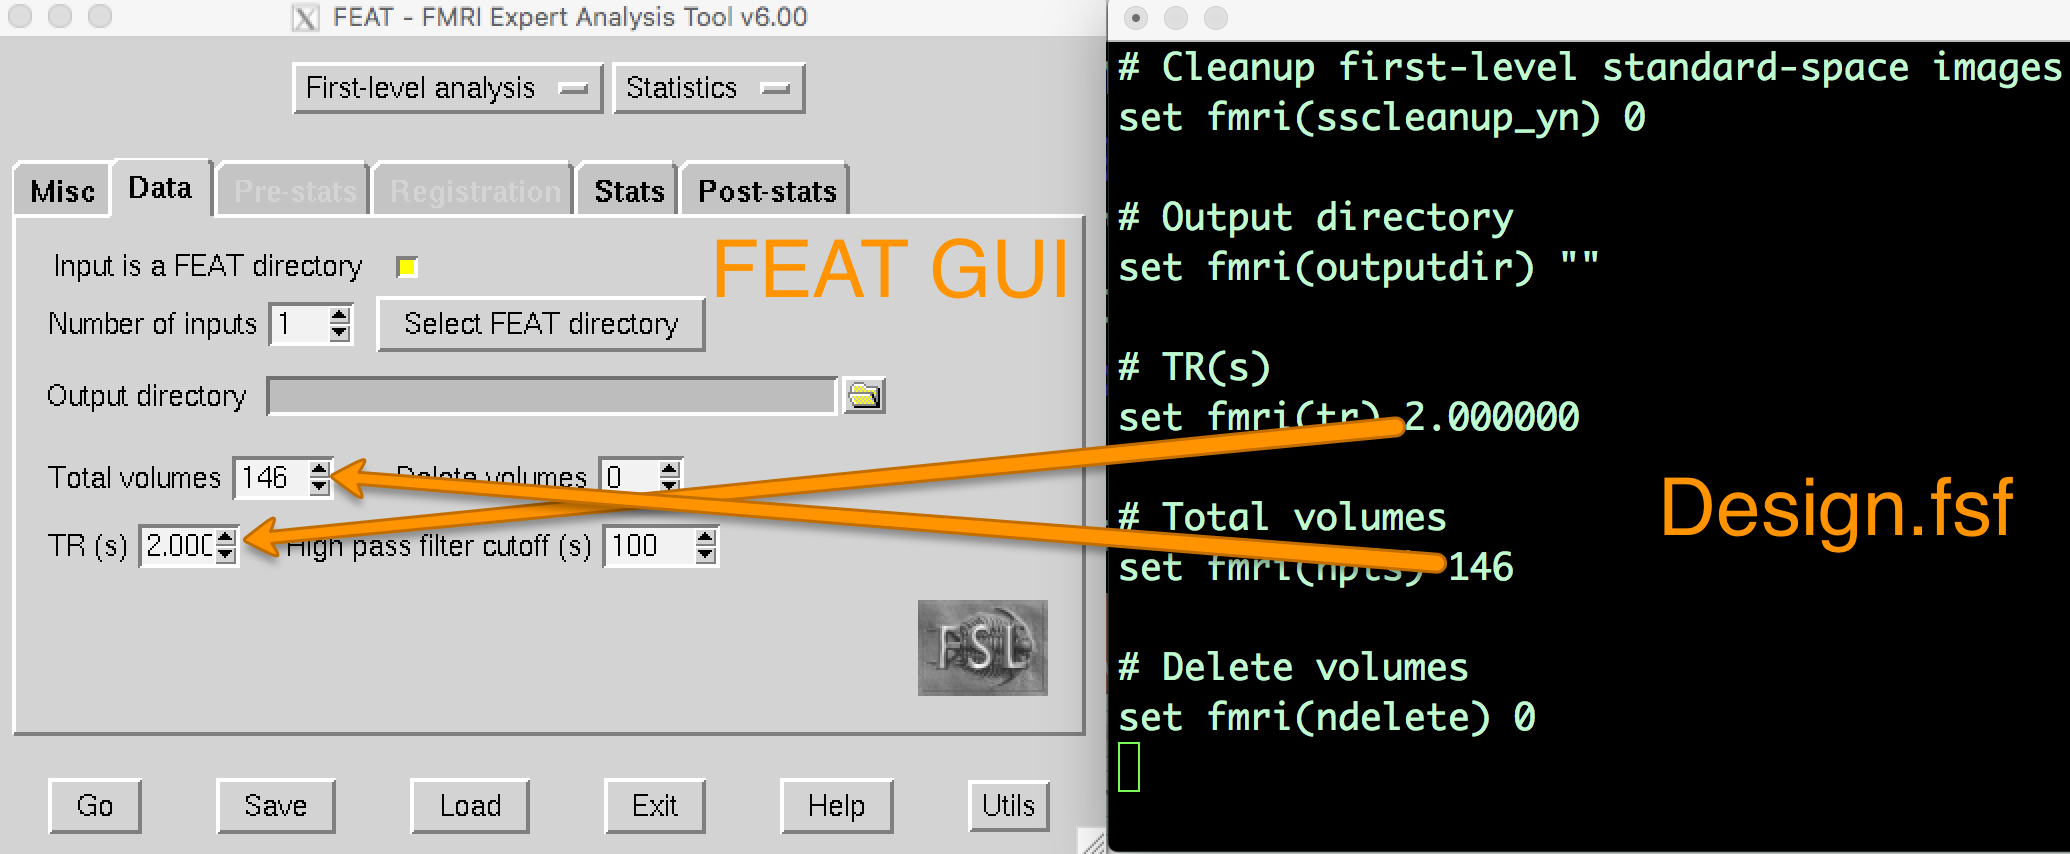
When you analyzed the first run of sub-08, a directory called run1.feat was created. Within that directory, there are several files and sub-directories. One of these files, design.fsf, contains all of the code transcribed from the FEAT GUI into a text file. This is the code that FSL runs to do each preprocessing and modeling step. If you open up the design.fsf file in a text editor and the FEAT GUI that you used to create the design.fsf file and you compare them side-by-side, you can see where the data entered into the FEAT GUI is written into the design.fsf file.
If you open up the FEAT GUI, click on the Load button at the bottom of the screen, and select the design.fsf file in the run1.feat directory, it will change all of the settings to what you had entered into the GUI when you saved the script.
In the previous tutorials we ran FEAT separately for preprocessing and for model fitting. We will now create a template that combines both of these steps by selecting “Full Analysis” from the dropdown menu of the FEAT GUI.
First, remove the current run1.feat directory by typing rm -r run1.feat. Then open up the FEAT GUI by typing Feat_gui from the command line. Instead of doing this as two separate sessions, we will run it as a single analysis by leaving the “Full Analysis” option selected from the dropdown menu. Using the previous tutorials as a guide, fill in all of the required fields for both preprocessing and model fitting.
Once you have filled in all of the fields, instead of clicking the Go button, click Save and label the file design_run1. This will save out several files with extensions such as “con”, “mat”, and “png”, as well as a file called design_run1.fsf; it is this file that we will be using for our script.
Now do the same procedure for run 2, loading the appropriate functional data and timing files. Save the file as design_run2.fsf. This procedure can be complicated, so if you need to see how to do it in real time, you can watch a screencast video by clicking on the link at the end of this page.
Note
The rest of the Scripting process assumes that you are already familiar with for-loops, conditional statements, and the basics of scripting as well as sed. If not, review those tutorials before going on.
Open design_run1.fsf in a code editor such as TextWrangler and take a look at all of the options that have been filled in. (Note: If you do use TextWrangler, in order to open the .fsf file you need to click on the “Options” button and select “Show hidden items.”) Our goal is to make this a template that can be run for any subject, with slight alterations that will be changed in a for-loop. In this case, the only thing we need to change is the subject name - the rest of the options will be the same for each subject.
Running the Script
Move the design_run1.fsf and design_run2.fsf files to the directory containing your subjects (i.e., mv design*.fsf .., and then cd ..). Then download the script run_1stLevel_Analysis.sh and move it to the Flanker directory. The script is reprinted here:
#!/bin/bash

# Generate the subject list to make modifying this script
# to run just a subset of subjects easier.

for id in `seq -w 1 26` ; do
    subj="sub-$id"
    echo "===> Starting processing of $subj"
    echo
    cd $subj

        # If the brain mask doesn’t exist, create it
        if [ ! -f anat/${subj}_T1w_brain_f02.nii.gz ]; then
            echo "Skull-stripped brain not found, using bet with a fractional intensity threshold of 0.2"
            # Note: This fractional intensity appears to work well for most of the subjects in the
            # Flanker dataset. You may want to change it if you modify this script for your own study.
            bet2 anat/${subj}_T1w.nii.gz \
                anat/${subj}_T1w_brain_f02.nii.gz -f 0.2
        fi

        # Copy the design files into the subject directory, and then
        # change “sub-08” to the current subject number
        cp ../design_run1.fsf .
        cp ../design_run2.fsf .

        # Note that we are using the | character to delimit the patterns
        # instead of the usual / character because there are / characters
        # in the pattern.
        sed -i '' "s|sub-08|${subj}|g" \
            design_run1.fsf
        sed -i '' "s|sub-08|${subj}|g" \
            design_run2.fsf

        # Now everything is set up to run feat
        echo "===> Starting feat for run 1"
        feat design_run1.fsf
        echo "===> Starting feat for run 2"
        feat design_run2.fsf
                echo

    # Go back to the directory containing all of the subjects, and repeat the loop
    cd ..
done

echo
This script uses all of the commands and concepts you learned in the Unix tutorials. It begins with a shebang and some comments describing what exactly the script does; and then backticks are used to expand seq -w 1 26 in order to create a loop that will run the body of the code over all of the subjects. The script uses a conditional to check whether the skull-stripped anatomical exists, and if it doesn’t, the skull-stripped image is generated. Then the template design*.fsf file is edited to replace the string sub-08 with the current subject’s name. The *.fsf files are run with the command feat, which is like running the FEAT GUI from the command line. Echo commands are used throughout the script to let the user know when a new step is being run.
You can run the script by simply typing bash run_1stLevel_Analysis.sh from the Flanker directory. The echo commands will print text to the Terminal when a new step is run, and HTML pages will track the progress of the preprocessing and statistics.
Note
The script will loop over all of the subjects in the Flanker dataset and do the preprocessing and statistical analysis for each run. The time this will take depends on how fast your machine is, but it should take around 2-4 hours. Be sure to do quality checks for each subject just as you did during the Preprocessing tutorials.
Video
Click here for a video showing you how to download and run the above script. It is the same video that summarizes the final Unix chapter, to show the convergence between the two courses.