E-Prime Tutorial #4: Lists, Procedures, and Attributes
Expanding the Experiment
So far we have created the bare minimum of an experiment: We have an introductory screen; the participant sees a screen with instructions about how to perform the task; a fixation screen signalizes that a trial is about to begin; and a Slide object presents the word “blue” in red text, to which the participants need to override their impulse to respond to the word, and respond to the color instead. Afterwards a Text Object ties up the experiment and bids the subject farewell.
This is the skeleton of any experiment, and can be used as a template for virtually any study that you have in mind. The only problem lies in how to extend this template to include as many trials as we want. If we required one hundred Stroop trials in our experiment, it would be tedious to continue manually inserting the same sequence of Fixation -> Stroop.
The List Object
Fortunately, E-Prime has a feature that allows us to loop through several instances of the same or similar trials: The List Object. The List Object will repeat all of the objects that come after it as many times as we like; we can also indicate how many trials of a particular condition we would like to display in the experiment, and which properties we would like to change on a given trial - such as the color of the text.
To illustrate this, click and drag a List Object from the Toolbox sidebar onto the experimental timeline and place it between the Instructions and Fixation Text Objects, and then rename it to “StroopList”. If you double-click on it, you will see a window that contains both rows and columns. The rows we will refer to as Levels, and the columns will be called Attributes. Levels correspond to trials, and the Attributes are variables that we can specify for each trial. Attributes can be used in any of the Objects of your experiment, and all Attributes will be saved into the output files at the end of the experiment.
Notice that the default Attributes of a new List Object are called Weight, Nested, and Procedure. We will ignore the first two Attributes for now; they can be left as is. The Procedure Attribute, on the other hand, needs to be specified in order for the List Object to do anything. Typing a string of letters in this cell - for example, “StroopProc” - will create a new Procedure Object with a new Experimental Timeline contained within that List Object.
This new Procedure Object is similar to the Procedure Object at the top of the Structure tree, called “SessionProc”: Just as all of the objects on the SessionProc timeline are displayed consecutively, when a List Object is encountered, the Objects on that Experimental Timeline will also be run in order. The only difference is that the List Object allows us to loop over a subset of Objects as many times as we want, and also allows us to change the properties those objects.
Note
This illustrates how E-Prime is organized hierarchically. The main Procedure Object determines the flow of the overall experiment, while the List Object allows you to specify Procedures nested within that Procedure. The experiment will run all of the Objects specified by the List Object before returning to the primary Experimental Timeline.
Creating a List of Stroop Trials
Instead of creating new Fixation and StroopSlide objects on the new Experimental Timeline (i.e., StroopProc), we can save time by simply clicking and dragging the Fixation and StroopSlide objects from the main Experimental Timeline onto the StroopProc timeline. Double-click on the StroopProc object to open a new timeline window, and then click and drag the above-mentioned objects onto the timeline. Notice that when an object is copied from one timeline onto another, it leaves the original copy in its place; the new copy has the same properties as the original. If you move an object around its own timeline, it is simply moved to a different place without making a copy.
Note
Since we don’t need the original Objects on the original timeline, we can delete them.
Let’s say that we want to use two colors, red and blue; and that we want to create both congruent and incongruent stimuli. This leads to four different trial types. If we wanted two trials of each possible type, this results in eight trials total. To create these, double-click on the StroopList object and click on the button Add Multiple Levels (represented by two downward-facing arrows). Enter a value of “3” and press OK. Next, click on the Add Multiple Attributes button (represented by two rightward-facing arrows) and enter a value of “2” when prompted. If you double-click on the column header Attribute1, you can rename the Attribute; let’s call it “StroopWord”. Do the same thing for Attribute2, renaming it “StroopColor”.
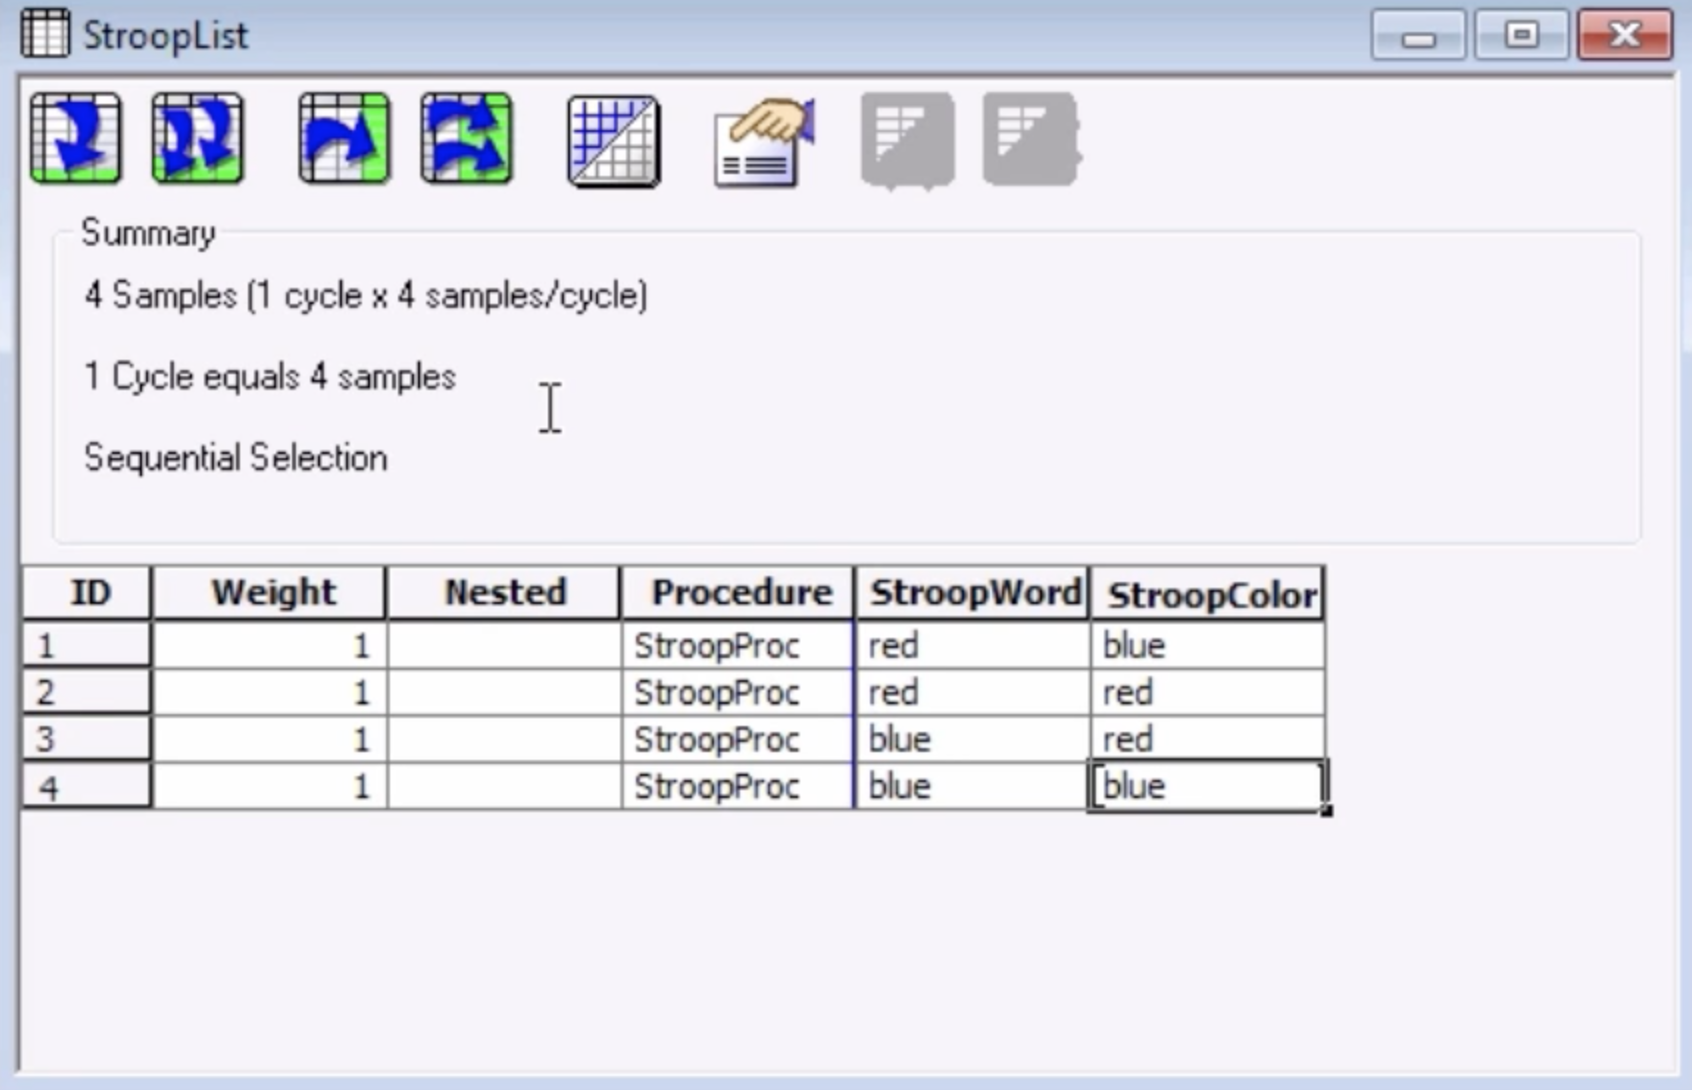
We will now create each possible combination of trial types in our experiment. For the first level of “StroopWord”, click on the cell and type “red”; for the first level of “StroopColor”, click on the cell and type “blue”. The combination will look something like this when you are finished:
Looping Over Stroop Trials
In the List Object above, there are a few lines below the word “Summary”, which say:
4 Samples (1 cycle x 4 samples/cycle)
1 Cycle equals 4 samples
Sequential Selection
This means that there are 4 samples in the current list, and that the list is run one time. “Sequential Selection” indicates that each of the rows of the list are run consecutively.
To make our experiment more compact and to repeat the same list of trials that we have created in our List object, click on the “Properties” button (i.e., the icon with a hand pointing to a white card). There are several tabs in the window that opens, but we will focus here on the “Selection” and “Reset/Exit” tabs.
The “Selection” tab allows you to specify the order in which the trials are selected. The default is Sequential, but we can change the selection to “Random”. This will randomly select a trial with the given attributes in our list, and then select each of the other trials until all of them have been selected; then the list will either exit or repeat, depending on what we specify. “Random with Replacement” allows the list to re-select a trial even after it has been selected on the current cycle.
The “Reset/Exit” tab specifies how many trials are in a cycle, or how many trials are run before the List object either repeats or exits. The default of “All samples” will run through however many samples there are; or, you can run a limited number of samples. The “Exit List” panel in the lower right allows you to specify how many cycles you want to run in the current List. In our case, since we want to run two trials of each condition type, we will change this to 2 cycles. Once you have finished making these changes, notice how the text in the summary panel is updated, and then click OK.
Adding Congruent and Correct Response Attributes
Later on, we will be comparing the reaction times for congruent compared to incongruent trials, as well as the accuracy between the conditions. From the StroopList object, add two more attributes: Condition and CorrectResp. If the StroopWord and StroopColor are the same, label that trial as “congruent”; else, label it as “incongruent”. If the StroopColor attribute is blue, label the correct response as “f”; if the StroopColor is red, the correct response will be “j”. When you are finished, the List object attributes should look like this:

Using Attributes in other Objects
The attributes that you specified in the List object can be used in any of the objects that are within the Procedure timeline of that List object. For example, since we created a Procedure called “StroopProc” in our StroopList object, the attributes in that object can be used in either the Fixation or StroopSlide objects.
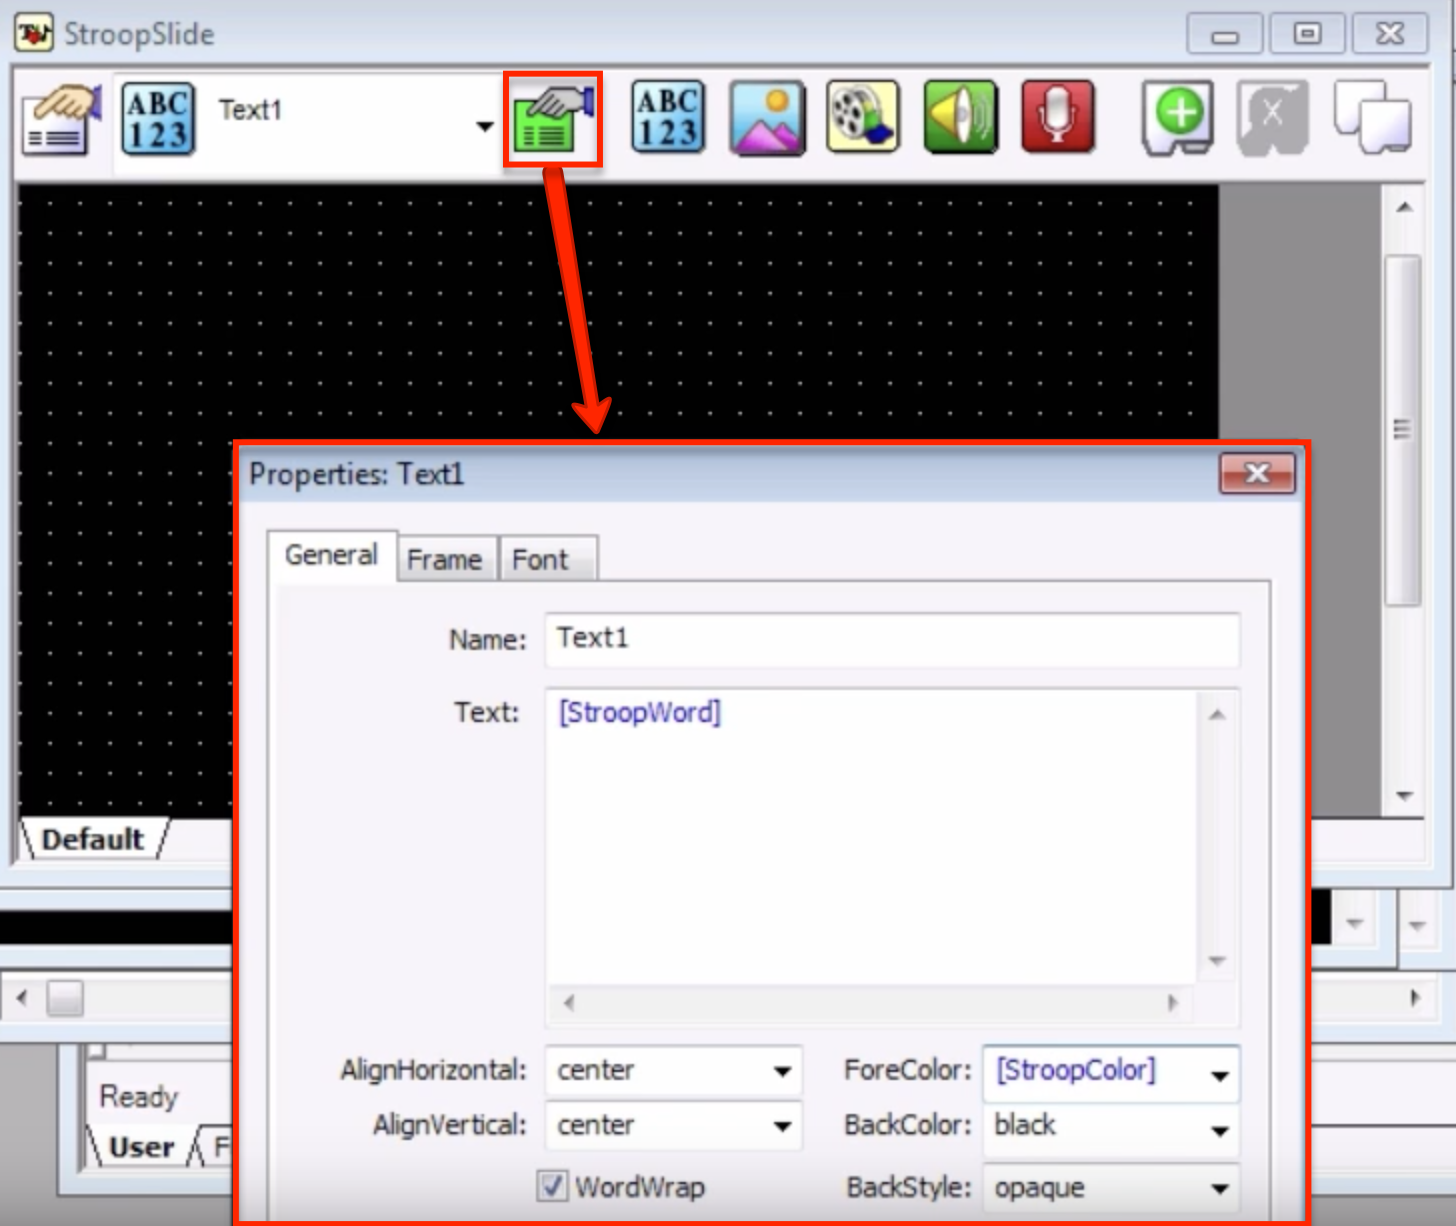
In this case, open the StroopSlide object, click on the text object in the middle of the screen (i.e., the word “blue”), and then click on the sub-object property button. Replace the word “blue” with the string [StroopWord], and replace the word “red” after the ForeColor property with the string [StroopColor]. When you are finished, the sub-object properties page should look like the following:
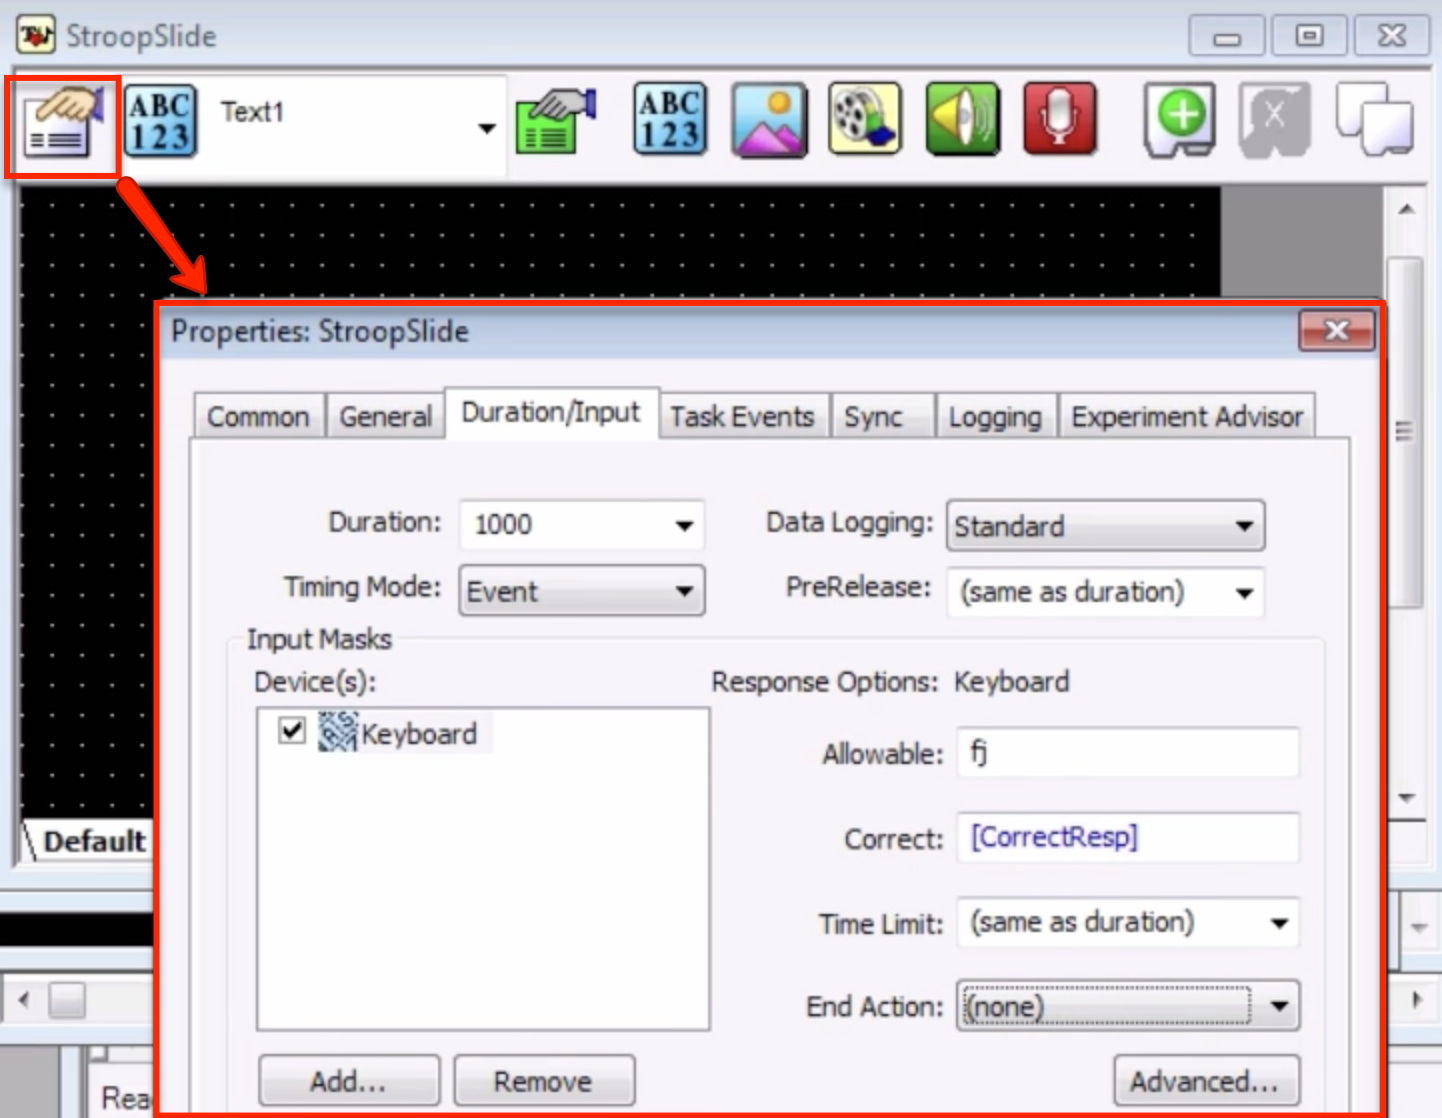
We can also use the CorrectResp attribute that we assigned in the List object. Open the Properties tab for the StroopSlide object, set the Allowable responses to fj and the Correct response to [CorrectResp], and change the End Action to (none). This allows the subject to make a response within the time that the object is presented without terminating the current object when a response is made.
When a trial from the List is selected, the corresponding attributes will then populate the object where they are indicated with brackets. For example, if trial number 3 is randomly selected from the List object, it will have the following properties:
StroopWord = blue
StroopColor = red
Condition = incongruent
CorrectResp = j
In the StroopSlide object for that trial, the contents of each word on the left will be replaced by the value on the right. The following figure shows how the attributes are used in the StroopSlide object:

You can set any attributes you want, using them in any object within the scope of the procedure timeline of the current List object. This allows you to create more flexible experiments and to be more economical with the amount of objects you use to loop over multiple trials.
Exercises
Change the Selection Order of the List object to “Random with Replacement.” Run the experiment, and notice whether the order of these stimuli differ from the ones that were selected with Replacement.
Add a level to the StroopList Object, and for this level replace the StroopProc string with the text “HelloProc”. Add a TextDisplay Object to this procedural timeline, call it “HelloDisplay”, and enter the text “Hello”. Run the experiment, and observe how two separate procedures can be called upon by the same List object.
Select the sub-object properties tab for the text of the Stroop Object. What other attributes could we control from the List object? Select one of them (such as “BackStyle” or “AlignVertical”), note the options that you have, and then add an attribute to the StroopList Object to set them to another value when you run the experiment.
Video
For a video overview of Lists, Procedures, and Attributes, click here.