Chapter 1: Brain Extraction (also known as “skullstripping”)
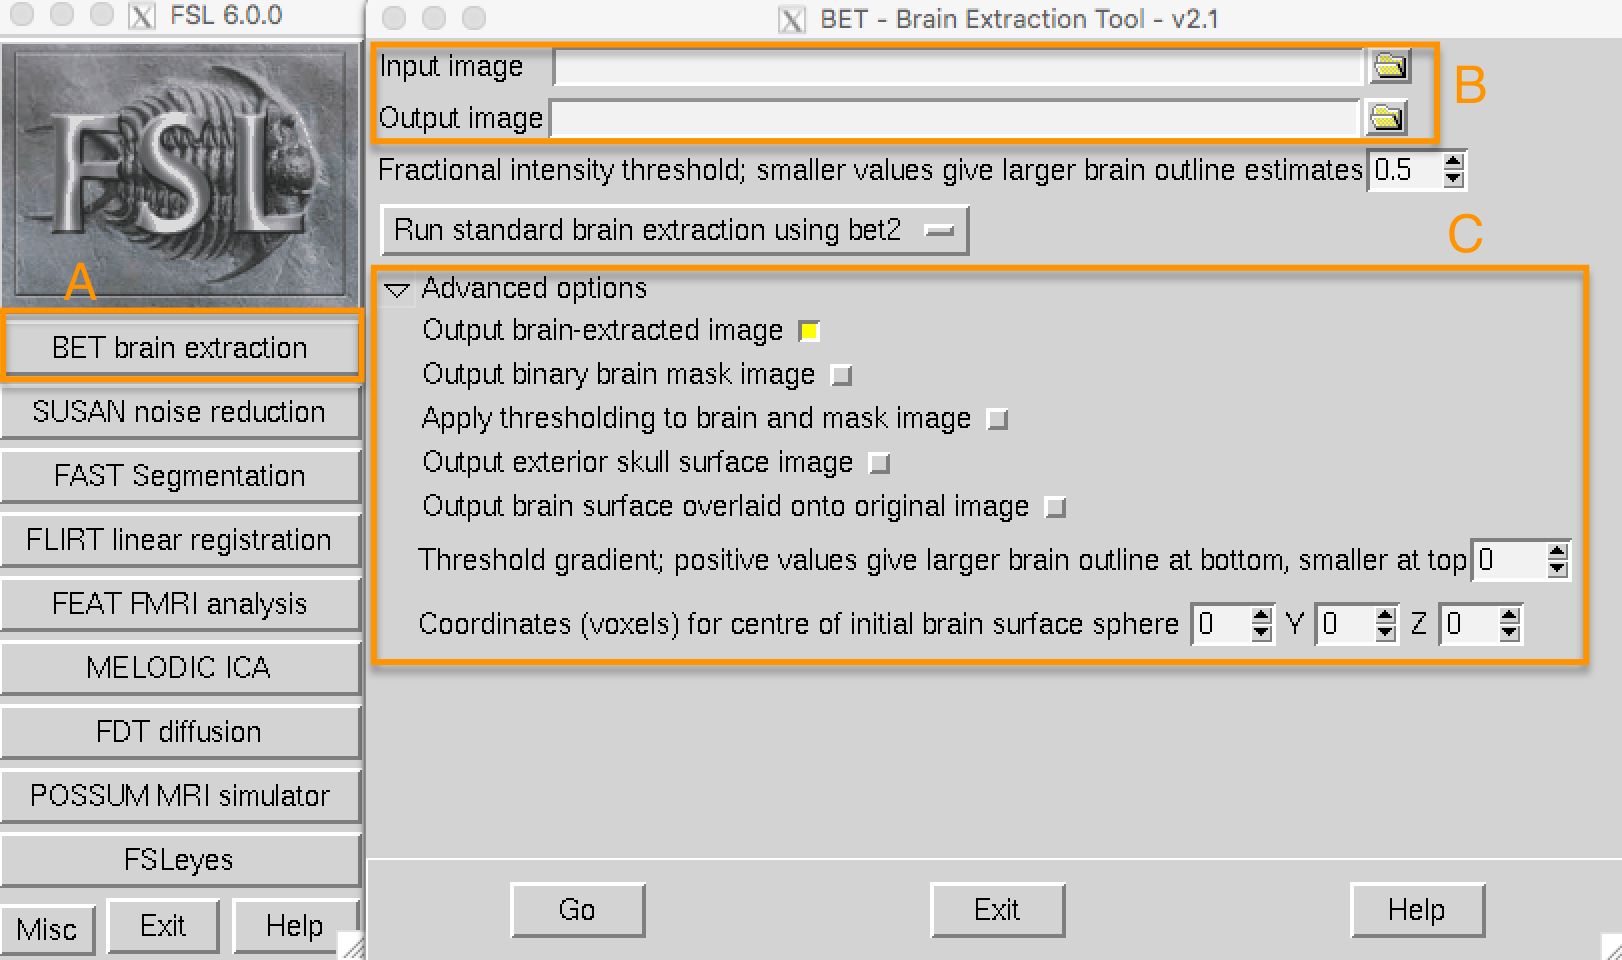
Since fMRI studies focus on brain tissue, our first step is to remove the skull and non-brain areas from the image. FSL has a tool for this called bet, or the Brain Extraction Tool. It is the first button listed on the FSL GUI (indicated by “A” in the figure below). If you click on this button, another window opens that allows you to specify the Input image to skullstrip and what to label the Output image that has been skullstripped (B), and an expandable sub-window that allows you to specify advanced options (C).
Note
For BET and many of the other FSL tools, you are required to specify an input image and a label for the output image: Some operation is performed on the input image (skullstripping, for example) and the output image is the result of that operation. Usually the other options are set to defaults that work well for the majority of datasets, but you can override them if you want.
Open the FSL GUI from the sub-08 directory, click on the Folder icon next to the Input image field, and navigate to the anat directory. Select the file sub-08_T1w.nii.gz and click the OK button. Notice that the Output image field is automatically filled in with the word brain appended to your Input image, which is FSL’s default. You can change the name if you like, but for this tutorial we will leave it as is.
Now click the Go button at the bottom of the window. You will see some text written to your Terminal showing which commands are being used to run a command called bet2. Take a moment to see how the GUI corresponds to the Terminal - later on we will take advantage of this by creating a template through the GUI and then modifying it in the Terminal to automatically preprocess all of the subjects in our dataset.
Looking at the data
When the Terminal says “Finished”, bet2 is done. Since you have created a new image you should look at your data, which we will do after each preprocessing step.
Note
Newcomers often hear the phrase “Look at your data” intoned like a mantra. Without knowing how to look at one’s data, the words become meaningless at best, a false comforter at worst. Each of the preprocessing steps in this chapter will be followed by recommendations of what to look for and concrete examples of what is OK and what is a problem - and what to do about it. Although we cannot cover every possible example, as you gain experience you will develop your judgment of what images are of good quality, and which ones need to be either fixed or removed.
Click on the FSLeyes button at the bottom of the GUI. When it opens, click on File -> Add from File and hold shift to select both the original anatomical image and the skullstripped image you just created. As you saw in a previous chapter, you will want to change the contrast to clearly distinguish the grey matter from the white matter.
By loading both images you can compare the image before and after the skull was removed. In the Overlay List panel in the lower left corner of FSLeyes, click the “eye” icon to hide the corresponding image. For example, if you click on the eye icon next to sub-08_T1w, the original T1 anatomical image will become invisible, and you will only see the skullstripped brain. If you click on the eye again, you will see the original T1. To make the differences between the brains more apparent, highlight the skullstripped image in the Overlay List panel, then change the contrast from Greyscale to Blue-Light blue. The animation below shows you how to do this.
Warning
With the November 2019 release of fsleyes, some users encounter the following error message when they try to load an image generated by any of the FSL commands: “Error loading overlay: Does not look like a BIDS file.” If you get this error message, try moving the .json files in the anat and func directories into a separate folder, and then try to load the images again.
Click around the image with your mouse and observe where there is either too much brain or too little skull that was removed. Remember that we are trying to create an image that has had the skull and face stripped clean away, with only the brain (e.g., cortex, subcortical structures, brainstem, and cerebellum) remaining.

A demonstration of how to use BET to examine the anatomical image before and after skullstripping. Note that in the frontal cortex, part of the brain has been stripped away. Make sure to check all three viewing panes to see where there are problems.
Fixing a bad skullstrip
If you’re not happy with the skullstripping, what can you do about it? Recall that the BET window contains options that we could change if we liked. One of the fields, labeled Fractional intensity threshold, is set to 0.5 as a default. The neighboring text explains that smaller values give larger brain outline estimates (and, conversely, larger values give smaller brain outline estimates). In other words, if we think that too much brain has been removed, we should set this to a smaller number, and vice versa if we think too little skull has been removed.
Since it appears that BET has removed too much brain, try lowering the fractional intensity threshold to 0.2. Also make sure to change the output name to something that will help you remember what you did - for example, sub-08_T1w_brain_f02. Click the Go button to re-run skullstripping.

When it has finished, load the newest skullstripped image in FSLeyes. Click on the eye icon next to the original anatomical image, and also click on the eye icon next to the newest skullstripped image that we have just created. Note where more cortex has been preserved, especially in the frontal cortex and parietal cortex. You may also have noticed that more dura mater and bits of skull remain in this image. As a general rule, it is better to err on the side of leaving too much skull, as opposed to removing too much cortex - bits of skull here and there won’t cause future preprocessing steps to fail (such as normalization), but once cortex is removed, you cannot recover it.
Exercises
Change the fractional intensity threshold to 0.1 and rerun BET, making sure to choose an appropriate output name to keep your files organized. View the result in FSLeyes. Repeat these steps with a fractional intensity threshold of 0.9. What do you notice? What seems to be a good threshold?
Experiment with different contrast colors for the overlay image in FSLeyes to see which one you like the best. Use the Zoom slider (next to the magnifying glass icon) to focus on a region you think hasn’t been stripped well. Take a photo of the montage (i.e., all three viewing panes) by clicking on the Camera icon in the toolbar above the montage.
Video
To see a screencast demonstrating how to check your skullstripped image, click here. This may help you with the exercises above.